Following a Spline
m (update link) |
(Cleanup to make the page easy to understand) |
||
| Line 15: | Line 15: | ||
* {{l|Doc:Following a Spline#Create the Layers|Draw a curve and an arrow}} | * {{l|Doc:Following a Spline#Create the Layers|Draw a curve and an arrow}} | ||
| − | * {{l|Doc:Following a Spline#Make the Arrow Move and Rotate|Link the arrow's Origin and Rotation}} to the Spline so the arrow follows the curve | + | * {{l|Doc:Following a Spline#Make the Arrow Move and Rotate|Link the arrow's Origin and Rotation}} to the Spline so that the arrow follows the curve |
== Tutorial == | == Tutorial == | ||
| − | + | The tutorial is intended to provide a demonstration on how to use this feature. | |
| + | |||
=== Create the Animation === | === Create the Animation === | ||
| − | File | + | * Create a new animation by selecting from the menu {{c|File|New}}. |
| + | |||
=== Create the Layers === | === Create the Layers === | ||
| − | Select the {{l|Spline Tool}} | + | First step, let's draw the Spline: |
| + | |||
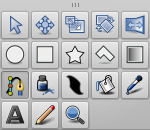
| + | * Select the {{l|Spline Tool}} from the Toolbox: | ||
[[File:Spline-tool-0.63.06.png|frame|none]] | [[File:Spline-tool-0.63.06.png|frame|none]] | ||
| − | enable | + | * In the {{l|Tool_Options_Panel}}, enable only the Outline Layer type. |
| − | + | * Draw a Spline that you want the arrow to move along. | |
| − | + | * Click the {{Literal|Make Spline}} icon in the bottom left of the {{l|Tool_Options_Panel}} to create the Spline. | |
| − | |||
| − | |||
| − | + | Second step, let's draw the arrow: | |
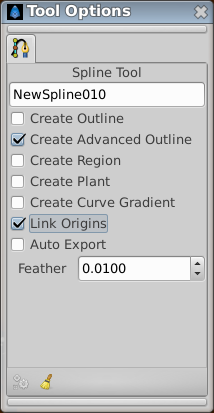
| − | + | * Select the {{l|Spline Tool}}, this time enabling {{Literal|Create Outline}} and {{Literal|Create Region}} Layer types: | |
| + | [[File:Spline-Tool-Options_0.63.06.png|frame|none]] | ||
| − | + | * Draw an arrow (or any another arbitrary shape) pointing to the right side of the Canvas. | |
| − | + | * Switch to the {{l|Transform Tool}}. | |
| − | + | * Select the Outline, press {{Shortcut|Ctrl+a}} to select all its {{l|Handle|handles}} except the green position handle. | |
| − | {{l|Group}} the | + | * Drag the handles so that the arrow is centered around the green position handle. |
| + | |||
| + | * Add a {{l|Rotate Layer}} above the Outline and Region Layers. | ||
| + | |||
| + | * {{l|Group}} the Rotate, Outline, and Region Layers. At this point there are 2 top-level Layers: | ||
| + | ** an Outline Layer | ||
| + | ** a Group Layer containing the arrow and the Rotate Layer | ||
| − | |||
=== Make the Arrow Move and Rotate === | === Make the Arrow Move and Rotate === | ||
| − | * Select the | + | * Select the Group Layer by selecting it in the {{l|Layers Panel}}. |
| − | + | ||
| − | + | ||
| − | + | ||
| − | + | * Then: | |
| + | ** select its green origin position {{l|Handle|handle}} by clicking on it in the canvas window | ||
| + | ** select the Rotate Layer by holding {{Shortcut|Ctrl}} and clicking it in the Layers Panel | ||
| + | ** select the blue rotation handle by holding {{Shortcut|Ctrl}} and clicking on it in the canvas window | ||
| − | + | At this point, there are 2 Layers selected and one handle from each of those 2 Layers selected. | |
| − | + | * Now, select also the curved Spline Layer (it should be the last Layer in the Layer Panel's list) by holding {{Shortcut|Ctrl}} and clicking on it. | |
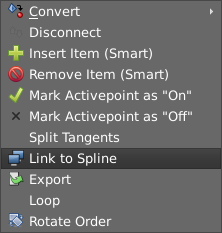
| − | From the context menu that pops up, select {{Literal|Link to Spline}} | + | * Right-click on the dotted line that indicates the position of the curved Spline, not on any handle, but on the dotted line between handles. |
| + | |||
| + | * From the context menu that pops up, select {{Literal|Link to Spline}}: | ||
[[Image:Spline-Link-to-0.63.06.png|none|frame|See also {{l|Command:Link_to_Spline}} ]] | [[Image:Spline-Link-to-0.63.06.png|none|frame|See also {{l|Command:Link_to_Spline}} ]] | ||
| − | The arrow | + | The arrow Group should move so that its green position handle is on the Spline, and it should rotate so that the arrow points along the spline at that point. |
| − | Select just the | + | * Select just the Group Layer, and drag its green handle around. The handle is now constrained to the Spline and dragging it will also affect the rotation of the arrow. |
| − | We can now animate the arrow | + | We can now animate the arrow. |
| − | * at time '''0f''', drag the | + | * Turn on {{l|Animate_Editing_Mode}} by clicking the icon in the bottom right of the canvas window: |
| − | * at time '''5s''', drag the same position handle to the other end of the | + | ** at time '''0f''', drag the Group Layer's green position handle to one end of the Spline |
| + | ** at time '''5s''', drag the same position handle to the other end of the Spline | ||
| − | Try {{c| | + | Try {{c|File|Preview|}} to watch the animation. |
== Results == | == Results == | ||
| Line 85: | Line 96: | ||
[[File:Arrow-follows-bline.gif|center|alt Following a Spline example]] | [[File:Arrow-follows-bline.gif|center|alt Following a Spline example]] | ||
| − | Synfig project : {{l|Media:Arrow-follows-bline.sifz|Arrow-follows-bline.sifz}} | + | Synfig project: {{l|Media:Arrow-follows-bline.sifz|Arrow-follows-bline.sifz}} |
== Controlling the linear velocity == | == Controlling the linear velocity == | ||
| − | By default, the arrow travels the whole spline with a constant velocity, independently of the | + | By default, the arrow travels the whole spline with a constant velocity, independently of the Spline structure. |
| + | |||
| + | If you select the Group Layer and look at the Parameters Panel, you'll see that its Origin parameter is {{L|convert|converted}} to {{Literal|Spline Vertex}} type. This is done automatically when {{Literal|Link to Spline}} is executed. | ||
| − | + | You can disable the "Homogenous" subparameter and then the speed of the arrow will depend on the Spline structure, it will take the same time to move along each segment of the Spline. So if there's a long straight segment then a bendy complex part, the arrow will move much faster along the straight segments (since there will be less vertices in that part). In physics terms, the linear velocity (that is, the speed over the Spline) is not constant. | |
For illustration of the "Homogenous" effect see [http://www.youtube.com/watch?v=3PGXroxBcuo this demo]. | For illustration of the "Homogenous" effect see [http://www.youtube.com/watch?v=3PGXroxBcuo this demo]. | ||
== See also == | == See also == | ||
| − | + | * Link to Spline command: {{l|Command:Link_to_Spline}} | |
| − | + | * A [https://youtu.be/d1hPxgq2qeU video tutorial] showing the steps of this page. | |
| − | + | ||
| − | * Link to Spline command : {{l|Command:Link_to_Spline}} | + | |
| − | * A [https://youtu.be/d1hPxgq2qeU video | + | |
Revision as of 00:44, 28 March 2020
- Note: There is also a slightly out-of-date tutorial on this topic at Tracking Curves. It contains some info, particularly about link/export, which hasn't yet been added to this new tutorial. There is also another very out-of-date tutorial for synfig 0.61.08.
Contents
Introduction
This tutorial will demonstrate how to make an object follow the path of an arbitrary curve, rotating to face the direction of travel.
Summary
We're going to:
- Draw a curve and an arrow
- Link the arrow's Origin and Rotation to the Spline so that the arrow follows the curve
Tutorial
The tutorial is intended to provide a demonstration on how to use this feature.
Create the Animation
- Create a new animation by selecting from the menu "File → New".
Create the Layers
First step, let's draw the Spline:
- Select the Spline Tool from the Toolbox:
- In the Tool Options Panel, enable only the Outline Layer type.
- Draw a Spline that you want the arrow to move along.
- Click the "Make Spline" icon in the bottom left of the Tool Options Panel to create the Spline.
Second step, let's draw the arrow:
- Select the Spline Tool, this time enabling "Create Outline" and "Create Region" Layer types:
- Draw an arrow (or any another arbitrary shape) pointing to the right side of the Canvas.
- Switch to the Transform Tool.
- Select the Outline, press Ctrl+a to select all its handles except the green position handle.
- Drag the handles so that the arrow is centered around the green position handle.
- Add a Rotate Layer above the Outline and Region Layers.
- Group the Rotate, Outline, and Region Layers. At this point there are 2 top-level Layers:
- an Outline Layer
- a Group Layer containing the arrow and the Rotate Layer
Make the Arrow Move and Rotate
- Select the Group Layer by selecting it in the Layers Panel.
- Then:
- select its green origin position handle by clicking on it in the canvas window
- select the Rotate Layer by holding Ctrl and clicking it in the Layers Panel
- select the blue rotation handle by holding Ctrl and clicking on it in the canvas window
At this point, there are 2 Layers selected and one handle from each of those 2 Layers selected.
- Now, select also the curved Spline Layer (it should be the last Layer in the Layer Panel's list) by holding Ctrl and clicking on it.
- Right-click on the dotted line that indicates the position of the curved Spline, not on any handle, but on the dotted line between handles.
- From the context menu that pops up, select "Link to Spline":

The arrow Group should move so that its green position handle is on the Spline, and it should rotate so that the arrow points along the spline at that point.
- Select just the Group Layer, and drag its green handle around. The handle is now constrained to the Spline and dragging it will also affect the rotation of the arrow.
We can now animate the arrow.
- Turn on Animate Editing Mode by clicking the icon in the bottom right of the canvas window:
- at time 0f, drag the Group Layer's green position handle to one end of the Spline
- at time 5s, drag the same position handle to the other end of the Spline
Try "File → Preview" to watch the animation.
Results
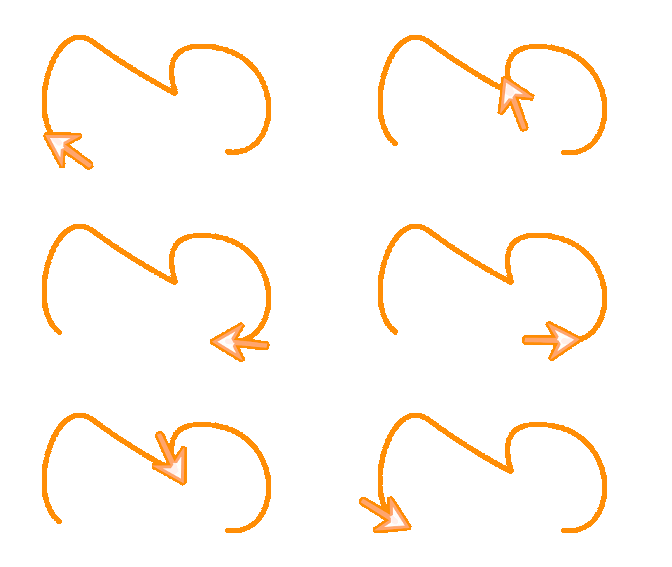
This is the animation I ended up with:
Synfig project: Arrow-follows-bline.sifz
Controlling the linear velocity
By default, the arrow travels the whole spline with a constant velocity, independently of the Spline structure.
If you select the Group Layer and look at the Parameters Panel, you'll see that its Origin parameter is converted to "Spline Vertex" type. This is done automatically when "Link to Spline" is executed.
You can disable the "Homogenous" subparameter and then the speed of the arrow will depend on the Spline structure, it will take the same time to move along each segment of the Spline. So if there's a long straight segment then a bendy complex part, the arrow will move much faster along the straight segments (since there will be less vertices in that part). In physics terms, the linear velocity (that is, the speed over the Spline) is not constant.
For illustration of the "Homogenous" effect see this demo.
See also
- Link to Spline command: Command:Link_to_Spline
- A video tutorial showing the steps of this page.


