Движение вдоль кривой
m (Zelgadis moved page Doc:Following a BLine/ru to Doc:Following a Spline/ru: Terminology rewrite) |
m |
||
| Line 1: | Line 1: | ||
<!-- Page info --> | <!-- Page info --> | ||
| − | {{Title|Движение вдоль кривой | + | {{Title|Движение вдоль кривой}} |
{{Category|Tutorials}} | {{Category|Tutorials}} | ||
{{Category|Tutorials Advanced}} | {{Category|Tutorials Advanced}} | ||
| Line 19: | Line 19: | ||
=== Создаём новый файл === | === Создаём новый файл === | ||
| − | + | File > New | |
| + | |||
| + | === Create the Layers === | ||
| + | |||
| + | Выберите инструмент {{l|Spline Tool|"Кривые"}} | ||
| + | [[File:Spline-tool-0.63.06.png|frame|none]] | ||
| + | |||
| + | enable just the Outline checkbox | ||
| + | |||
| + | draw a spline that you want the arrow to move along | ||
| + | |||
| + | click the {{Literal|Make Spline}} icon in the bottom left of the {{l|Tool_Options_Panel}} to create the spline. | ||
| + | |||
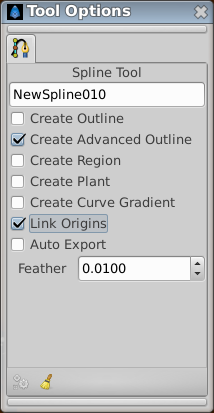
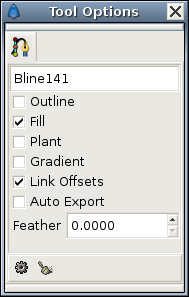
| + | still in the Spline Tool, enable {{Literal|Create Outline}} and {{Literal|Create Region}} checkboxes in tool options | ||
| + | [[File:Spline-Tool-Options_0.63.06.png|frame|center]] | ||
| + | |||
| + | draw an arrow or whatever, pointing to the right. | ||
| + | |||
| + | Switch to the {{l|Transform Tool}} | ||
| + | |||
| + | select the outline, hit control-a to select all its {{l|Handle|handles}} except the green position handle | ||
| + | |||
| + | drag the handle so that the arrow is centred around the green position handle | ||
| + | |||
| + | Add a {{l|Rotate Layer}} above the outline and region | ||
| + | |||
| + | {{l|Group}} the rotate, outline, and region layers | ||
| + | |||
| + | so now you've got 2 top-level layers: a curved path, and a group containing an arrow and a rotate layer | ||
| + | |||
| + | === Make the Arrow Move and Rotate === | ||
| + | |||
| + | Select the group layer by clicking it in the {{l|Layers Panel}} | ||
| + | |||
| + | select its green position handle by clicking on it in the canvas window | ||
| + | |||
| + | additionally select the Rotate layer by holding Control and clicking it in the Layers panel | ||
| + | |||
| + | additionally select the blue "rotation amount" handle by holding {{Shortcut|ctrl}} and clicking on it in the canvas window | ||
| + | |||
| + | so now we should have 2 layers selected, and one handle from each of those 2 layers selected | ||
| + | |||
| + | now additionally select the curved spline layer (it should be the last layer in the Layer panel's list) by holding {{Shortcut|ctrl}} and clicking on it | ||
| + | |||
| + | right-click on the dotted line that indicates the position of the curved spline - not on any handle, but on the dotted line between handle | ||
| + | |||
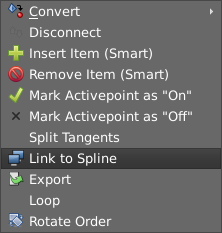
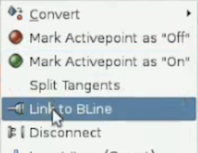
| + | from the context menu that pops up, select {{Literal|Link to Spline}} | ||
| + | [[Image:Spline-Link-to-0.63.06.png|frame|none]] | ||
| + | |||
| + | The arrow group should move so that its green position handle is on the spline, and it should rotate so that the arrow points along the spline at that point | ||
| + | |||
| + | Select just the group layer, and drag its green handle around. you'll see that the handle is constrained now to line on the spline, and that dragging it also affects the rotation of the arrow as expected | ||
| + | |||
| + | We can now animate the arrow. turn on {{l|Animate_Editing_Mode}} by clicking the icon in the bottom right of the canvas window. | ||
| + | |||
| + | * at time '''0f''', drag the group layer's green position handle to one end of the spline | ||
| + | * at time '''5s''', drag the same position handle to the other end of the spline | ||
| + | |||
| + | Try {{c|<Caret Menu>|<File>|Preview|}} to watch the animation. | ||
| + | |||
| + | == Results == | ||
| + | |||
| + | This is the animation I ended up with: {{l|Media:Arrow-follows-bline.sifz|Arrow-follows-bline.sifz}} | ||
| + | |||
| + | == Controlling the linear velocity == | ||
| + | |||
| + | By default, the arrow travels the whole spline with a constant velocity, independently of the spline structure. | ||
| + | |||
| + | If you select the group layer and look at the Parameters Panel, then you'll see that its Origin parameter is {{L|convert|converted}} to {{Literal|Spline Vertex}} type. This is done automatically when you do "Link to Spline" action. You can disable the "Homogenous" subparameter and then the speed of the arrow will depend on the spline structure - it will take the same time to move along each segment of the spline. So if there's a long straight part then a bendy complex part, the arrow will move much faster along the straight parts (since there will be less vertices in that part). In physics terms, the linear velocity (that is, the speed over the spline) is not constant. | ||
| + | |||
| + | For illustration of the "Homogenous" effect see [http://www.youtube.com/watch?v=3PGXroxBcuo this demo]. | ||
=== Создаём слои === | === Создаём слои === | ||
Revision as of 18:09, 20 October 2013
Contents
Введение
Если вы используете версию Synfig 0.61.08 или ниже, то читайте старую редакцию статьи, а эта статья актуальна для версии 0.61.09 и старше.
Итак статья о том как создать объект следующий вдоль произвольной кривой и поворачивающий при этом в сторону направления кривой.
Содержание
Нам предстоит:
- Нарисовать кривую и "стрелку"
- Связать стрелку и её "вращение" с кривой чтобы она следовала по ней
Создаём новый файл
File > New
Create the Layers
Выберите инструмент "Кривые"
enable just the Outline checkbox
draw a spline that you want the arrow to move along
click the "Make Spline" icon in the bottom left of the Tool Options Panel to create the spline.
still in the Spline Tool, enable "Create Outline" and "Create Region" checkboxes in tool options
draw an arrow or whatever, pointing to the right.
Switch to the Transform Tool
select the outline, hit control-a to select all its handles except the green position handle
drag the handle so that the arrow is centred around the green position handle
Add a Rotate Layer above the outline and region
Группа the rotate, outline, and region layers
so now you've got 2 top-level layers: a curved path, and a group containing an arrow and a rotate layer
Make the Arrow Move and Rotate
Select the group layer by clicking it in the Layers Panel
select its green position handle by clicking on it in the canvas window
additionally select the Rotate layer by holding Control and clicking it in the Layers panel
additionally select the blue "rotation amount" handle by holding Ctrl and clicking on it in the canvas window
so now we should have 2 layers selected, and one handle from each of those 2 layers selected
now additionally select the curved spline layer (it should be the last layer in the Layer panel's list) by holding Ctrl and clicking on it
right-click on the dotted line that indicates the position of the curved spline - not on any handle, but on the dotted line between handle
from the context menu that pops up, select "Link to Spline"
The arrow group should move so that its green position handle is on the spline, and it should rotate so that the arrow points along the spline at that point
Select just the group layer, and drag its green handle around. you'll see that the handle is constrained now to line on the spline, and that dragging it also affects the rotation of the arrow as expected
We can now animate the arrow. turn on Animate Editing Mode by clicking the icon in the bottom right of the canvas window.
- at time 0f, drag the group layer's green position handle to one end of the spline
- at time 5s, drag the same position handle to the other end of the spline
Try "<Caret Menu> → <File> → Preview" to watch the animation.
Results
This is the animation I ended up with: Arrow-follows-bline.sifz
Controlling the linear velocity
By default, the arrow travels the whole spline with a constant velocity, independently of the spline structure.
If you select the group layer and look at the Parameters Panel, then you'll see that its Origin parameter is converted to "Spline Vertex" type. This is done automatically when you do "Link to Spline" action. You can disable the "Homogenous" subparameter and then the speed of the arrow will depend on the spline structure - it will take the same time to move along each segment of the spline. So if there's a long straight part then a bendy complex part, the arrow will move much faster along the straight parts (since there will be less vertices in that part). In physics terms, the linear velocity (that is, the speed over the spline) is not constant.
For illustration of the "Homogenous" effect see this demo.
Создаём слои
поставьте флажок только напротив параметра "Создать кривую контура", нарисуйте кривую вдоль которой будет двигаться наша стрелка и нажмите кнопку "Создать кривую" в нижней части Панели Параметров Инструмента.
Теперь, не переключаясь с инструмента "Кривые" выберите флажки "Создать кривую контура" и "Создать кривую области" на Панели Параметров Инструмента,
нарисуйте стрелку или что то подобное, указывающую на право переключитесь на инструмент трансформации.
Кликните на контур "стрелки" и нажмите control-a чтобы выделить все контрольные точки контура, зелёная точка "позиции" при этом останется не выделенной, перетащите выделенные контрольные точки так чтобы зелёная точка "позиции" оказалась в центре "стрелки", после чего добавьте "Слой вращения" над слоями контура и заливки "стрелки" и изолируйте эти три слоя в один объединяющий слой.
Теперь у нас есть два основных слоя, один слой с кривой контура и второй изолирующий со "стрелкой" и слоем вращения.
Заставляем стрелку двигаться и вращаться
Выделите объединяющий слой кликнув на него в панели слоёв.
Выделите его зелёную точку "позиции" кликнув по ней в окне холста, также выделите слой Вращения удерживая Control и кликнув по нему на панели слоёв, в добавок ко всему этому выделите синюю точку "контроля вращения" удерживая Control кликнув по ней в окне холста.
Ну вот теперь у нас должно быть выделено два слоя и по одной контрольной точке из каждого слоя, теперь добавьте к этим выделенным слоям ещё и слой с кривой Bline (он должен быть последним на панели слоёв) кликнув на него удерживая Control.
Кликаем правой кнопкой на пунктирной линии которая показывает форму кривой Bline, не на какую нибудь точку на кривой, а именно на линию между точками.
В контекстном меню которое появится выберите "Привязать к кривой".
Изолированная "стрелка" должна переместиться так что её зелёная точка "позиции" окажется на кривой Bline и она должна повернутся указывая в сторону направления кривой в этой точке.
Выделите только изолированный слой и потаскайте зелёную точку "позиции" туда-сюда. Вы увидите что зелёная контрольная точка "стрелки" теперь двигается только вдоль прямой, перемещение также вызывает вращение "стрелки" как и ожидалось.
Теперь мы можем анимировать стрелку, включите "Режим редактирования анимации" нажав на иконку в нижнем правом углу окна холста.
На нулевом кадре поместите зелёную контрольную точку изолированного слоя "стрелки" на одном конце кривой Bline, а на пятой секунде перетащите эту точку в другой конец.
Посмотрите что получилось нажав Файл > Предпросмотр.
Результат
Вот анимация которая получилась в результате: Arrow-follows-bline.sifz
Контроль ускорения
По умолчанию стрелка проходит вдоль каждого сегмента кривой за одно и тоже время, поэтому если кривая имеет длинную прямую часть, а затем изгибается, то стрелка пройдёт по длинной части гораздо быстрее чем по изогнутой. Происходит это потому что на длинной части меньше вершин, а значит и сегментов.
Включив параметр homogenous (однородность) вы сделаете скорость движения постоянной по всей длине кривой, что и требуется достичь в большинстве случаев.
Видео по теме контроля ускорения здесь.
(Ниже следует Английский вариант этого абзаца для тех кто ничего не понял из русского =) пр. переводчика)
By default, the arrow takes the same time to move along each segment of the bline. So if there's a long straight part then a bendy complex part, the arrow will move much faster along the straight parts (since there will be less vertices in that part). In physics terms, the linear velocity (that is, the speed over the bline) is not constant.
By enabling the homogenous parameter of Link to BLine, the velocity becomes constant, as one almost always wants. See this demo.

