Difference between revisions of "Draw Tool"
From Synfig Studio :: Documentation
m (→Options) |
m (→Options: template) |
||
| (46 intermediate revisions by 11 users not shown) | |||
| Line 1: | Line 1: | ||
| − | + | <!-- Page info --> | |
| + | {{Title|Draw Tool}} | ||
| + | {{Category|Tools}} | ||
| + | {{NewTerminology}} | ||
| + | <!-- Page info end --> | ||
| − | The | + | {{l|Image:Draw_icon.png|64px}} <span style="font-size:150%">'''ALT-D'''</span> |
| + | |||
| + | The {{Literal|Draw Tool}} is the one that most artists will be familiar with. This {{l|Category:Tools|tool}} is best used with a drawing tablet, although it can be used with a mouse. | ||
| + | |||
| + | The {{Literal|Draw Tool}} can generate a {{l|Region Layer}}, an {{l|Outline Layer}} and an {{l|Advanced Outline Layer}} with pressure output from the tablet mapped to the line's width. | ||
==Options== | ==Options== | ||
| − | + | <!-- Use of Template|DrawToolOptions --> | |
| − | + | {{DrawToolOptions}} | |
| − | + | ||
| − | + | ||
| − | + | ||
| − | + | ||
| − | + | ||
| − | + | ||
| − | + | ||
| − | + | ||
| − | + | ||
| − | + | ||
| − | + | ||
| − | + | ||
| − | + | ||
| − | + | ||
| − | + | ||
| − | + | ||
| − | + | ||
| − | + | ||
| − | + | ||
==Buttons== | ==Buttons== | ||
| − | ;'''Fill Last Stroke''' | + | |
| − | : | + | ;'''Fill Last Stroke''' : [[File:Tool fill icon.png|20px]] Hit this button after having created a shape with the {{literal|Draw Tool}} to create a {{l|Region Layer}}, filled with the {{l|New_Layer_Defaults#Brush_Colors|current}} {{literal|Fill Color}}, of the last trace you have drawn. |
Latest revision as of 01:09, 8 March 2016
The "Draw Tool" is the one that most artists will be familiar with. This tool is best used with a drawing tablet, although it can be used with a mouse.
The "Draw Tool" can generate a Region Layer, an Outline Layer and an Advanced Outline Layer with pressure output from the tablet mapped to the line's width.
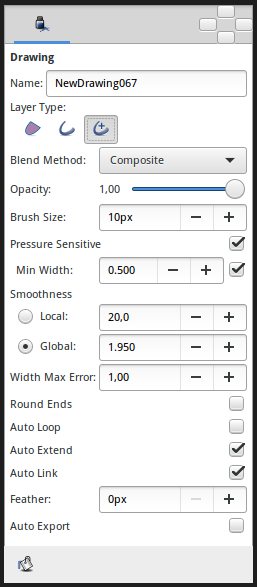
Options
The Tool Options Panel allows you to specify:
- Name : Used for the new layer; any number in this field will automatically increment with each layer created
- Layer Type : Whether create Outline and/or Advanced Outline, Region layers (Splines)
- Blend Method : The blending method used to composite on the layers below
- Opacity : Sets the Amount for new layers. Defaults to 1.00 (Completely opaque)
- Brush Size : Sets the Outline width or the size of the gradient (only for Outline, Advanced Outline and Curve Gradient)
- Pressure Sensitive
- Min Pressure : The value of this option clamps the lower end of the Pressure sensitivity to a specific value, essentially determining how thin the thinnest possible segment is relative to the Brush Size parameter in the Toolbox.
- Smoothness : Determines how much tablet jitter is removed, and as a result, how many vertices the resulting splines are composed of. Could by Local or Global
- Local : Adjust the Spline between the Splines points.
- Global : Adjust the Spline globally.
- Width Max Error : for advanced outline layer.
- Round End : The ends of the spline will be rounded, only for Outline, Advanced Outline layers.
- Auto Loop : When the stroke of the "Draw Tool" ends near the beginning of the stroke, automatically connect the last Handle to the first.
- Auto Extend : When the stroke begins and/or end at or near an endpoint Handle of another outline, the resulting outline is simply appended to the existing Outline Layer
- Auto Link : When the stroke begins and/or ends at or near a vertex Handle in another outline, and the outline isn't being extended by the "Auto Extend" option above, the first and/or last vertex of the resulting outline is linked to the Handle on the existing Outline Layer.
- Feather : Set the Feather Parameter on the layer
- Auto Export : Automatically Export the Spline list points into the Values Base Nodes of the Library Panel
Buttons
- Fill Last Stroke
-
 Hit this button after having created a shape with the "Draw Tool" to create a Region Layer, filled with the current "Fill Color", of the last trace you have drawn.
