Preview
Contents
Introduction
Rendering a long or complicated animation can take a while. You may need to do several renders before you are happy with your finished animation. Therefore, before you render your animation, it's a good idea to preview all or just a part of it at lower quality to save time.
You may also find that working on your animation by looking at a render in a normal media player is not very useful. You will see time displayed in fractions of a second instead of as frame numbers and moving backwards and forwards (scrubbing) can be difficult.
Synfig Studio has a very flexible preview tool that solves both of these problems.
Previewing an animation
There are two ways to preview the animation in your current canvas:
- You can press the canvas window toolbar Preview button
 , or
, or - you can open the Canvas Menu using the Canvas Menu Caret button and then select "File → Preview".
If you do either of these things the Preview Options dialog will appear.
The Preview Options Dialog
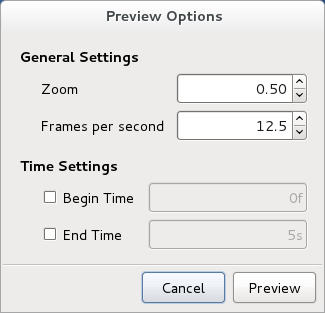
The Preview Options dialog looks like this:
It is divided into two sections: "General Settings" and "Time Settings". They are described below. When you have finished adjusting these settings you can click "Preview" and Synfig Studio will start rendering your preview and open the Preview Window. If you want to close the Preview Options dialog box without starting to render a preview you can click "Cancel" or press Escape.
General Settings
The "General Settings" allow you to adjust the quality of your preview – its size and its frame rate.
Normally, to save time, previews are smaller and have a lower frame rate than the original animation. But, because Synfig Studio is so flexible, you can actually render a preview with a higher frame rate and a larger size than the canvas you are working on!
Zoom
The "Zoom" spin box allows you to increase or decrease the size of your preview.
The number in the "Zoom" spin box is a scalar value. In other words, the width and height of your canvas are multiplied by this number to give you the final size of your preview. For example, a "Zoom" setting of:
- "1.0" means your preview will be the same size as your canvas
- "0.5" means your preview will be half the size of your canvas
- "2.0" means your preview will be twice the size of your canvas
You can enter a number directly into the "Zoom" spin box, or use the spin box arrows to increase or decrease it. You can not enter a value of less than "0.1" which is a tenth of your canvas size or more than "5.0" which is five times the size of your canvas.
Your preview is scaled to fit inside the Preview Window. The "Zoom" setting does not change the size of the Preview Window. So, if you use a high zoom setting you may have to increase the Preview Window size to see your preview properly.
|
Tip When you are animating you'll probably want to look at previews often. To save time, we recommend that you normally use a "Zoom" setting that is less than "1.0" when previewing your work. We think a "Zoom" setting "0.5" is a good compromise between preview rendering speed and quality.
|
Frames per second
The "Frames per second" spin box allows you to increase or decrease the frame rate - the number of frames per second your preview will have.
The number in the "Frames per second" spin box is a floating point number with one decimal place, so you can specify the frame rate accurate to a tenth of a second.
You can enter your frame rate setting directly into the "Frames per second" spin box, or use the spin box arrows to increase or decrease it. You can enter a "Frames per second" setting between "1.0" and "120.0".
The default frame rate setting in the "Frames per second" spin box is the frame rate of the canvas you are previewing divided by 2.
|
Tip When you are animating you'll probably want to look at previews often. To save time, we recommend that you normally use a "Frames per second" setting that is less than the frame rate of your finished animation when previewing your work. We think a "Frames per second" setting that is half of your final frame rate is a good compromise between preview rendering speed and quality.
|
Time Settings
The "Time Settings" allow you to specify which point in time you want your preview to begin and end. You don't have to adjust these settings – if you don't adjust them the entire duration specified in the Canvas Properties Dialog for your canvas will be previewed.
However, for complicated animations it can save a lot of time if you just preview a small section.
Begin Time
If you want to your preview to begin at a time that is not the beginning of you canvas (0f) then:
- Check the "Begin Time" check box
- Enter a time value in the "Begin Time" entry field.
|
Entering Time Values To input a time value you enter one or more floating point numbers separated by a space. You can add a time unit suffix immediately after each number. The time unit suffixes are h (hours), m (minutes), s (seconds) and f (frames). If you don't add a suffix to a number it is treated as a frame value. The numbers you enter are added together and then converted into a single time value in hours, minutes, seconds and frames.
Here are some valid time values:
Don't forget that the number of frames per second for your canvas is specified in the Canvas Properties Dialog and may change from canvas to canvas. |
End Time
If you want to your preview to end at a time before the end of the canvas you want to preview then:
- Check the "End Time" check box
- Enter a time value in the "End Time" entry field.
|
Note You can set a "Begin Time" and "End Time" that are after the duration of your current canvas. This is because your canvas could contain one or more imported or exported canvases that are part way through their duration when your current canvas duration has ended. By setting a "Begin Time" or and "End Time" that's after the duration of your current canvas you can see animation that occurs in those child canvases after the animation in your current canvas ends.
You can also set a negative "Begin Time" and "End Time". This is because your canvas could contain one or more imported or exported canvases that are part way through its duration when your current canvas is beginning (at 0f). By setting a negative "End Time" you can see animation that occurs in those child canvases before the animation in your current canvas begins.
|
|
Bug In Synfig 0.63.04 and before you can specify an "End Time" that's before the "Begin Time". This is a bug and we'll fix it soon.
|
The Preview Window
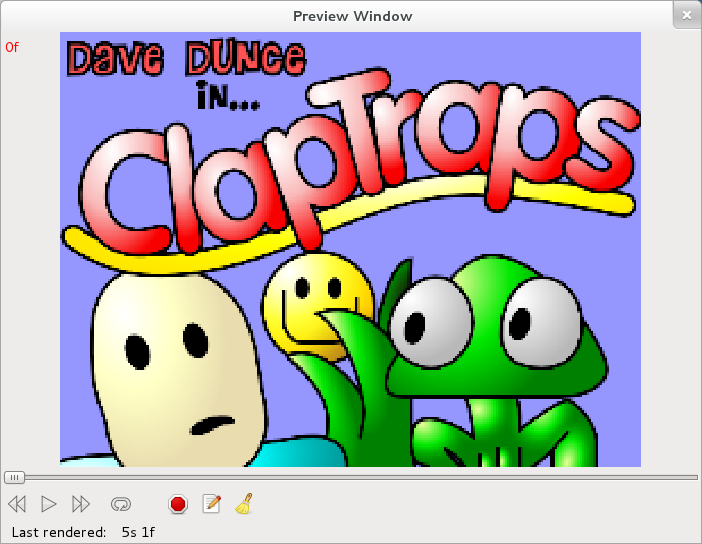
When you click "Preview" in the Preview Options dialog your preview will start to render and the Preview Window will appear:
The progress of your preview render is shown at the bottom of the Preview Window in the status bar. The "Last Rendered" time shows you the last frame of your preview that has been rendered. When the "Last Rendered" time equals the "End Time" you set in the Preview Options dialog your preview has finished rendering.
|
Bug In Synfig 0.63.04 and before you'll find that sometimes, due to rounding errors, the final "Last Rendered" time will be one frame past your "End Time". We'll fix this soon.
|
You don't have to wait for your preview to finish rendering before you start to look at it – you can preview the frames that have been rendered so far.
You can close the Preview Window at any time by pressing Escape, pressing AltF4 or clicking the "Close" button in the top corner of the Preview Window.
Preview Image
TODO You can re-size your Preview Image by resizing your preview window.
Frame Display
There is a red frame display to the top left of the Preview Image. It looks like this: ![]()
The Frame Display tells you which frame the Preview Image is displaying.
|
Note The Frame Display will not show you the time values of frames that do not exist in the canvas you are previewing:
Although the Frame Display is not updated, the Slider and Preview Image will continue to work as normal.
|
|
Bug In Synfig 0.63.04 and before you'll find that occassionally, due to rounding errors, the frame display will display a frame number that is incorrect. We've fixed this for the next version.
|
Slider
There is a Slider beneath the Preview Image. It looks like this:
![]()
You use it to do something that traditional animators call "rolling" or "flipping" their drawings. This is where animators use their fingers to flip through several drawings on paper quickly to look at movement.
The box the Slider sits on represents the duration of the currently available preview – the number of preview frames that have been rendered so far. The position of the Slider on this box shows you where the frame shown in the Preview Image appears within the currently available preview.
As your preview renders, the duration of the currently available preview gets longer, so you may notice the frame shown in the Preview Image and the Frame Display will change so that they accurately reflect the position of the Slider.
To use the Slider, you move your mouse over it, hold down the left mouse button and then move your mouse left and right.
| Slider has focus | |
|---|---|
| Slider does not have focus |
If the Slider has focus (see above) you can also use the ←→ keys to move it backwards and forwards. You can give the Slider focus by pressing ⇆ Tab until it gains focus or by clicking on it with your mouse.
Buttons
TODO There is a row of buttons under the slider:
![]() Next (rendered) frame - advances in increments of (canvas frame rate/preview frame rate) rounded to nearest frame.
Next (rendered) frame - advances in increments of (canvas frame rate/preview frame rate) rounded to nearest frame.
![]() Halt render - the slider will still cove entire duration, the frame display will stop at last rendered frame but you can scrub past it.
Halt render - the slider will still cove entire duration, the frame display will stop at last rendered frame but you can scrub past it.
TODO You can use cursor arrows and space to press the buttons
| Language: |
English |

