Layers Panel
From Synfig Studio :: Documentation
Revision as of 08:11, 8 September 2009 by Zelgadis (Talk | contribs) (Text replace - '[[' to '{{l|')
{{l|Category:Panels]]
Summary
The Layers Dialog allows you to view and manipulate the layer hierarchy in your scene. This is where you can determine which objects get drawn first, and create {{l|Paste Canvas|subsets of layers]] for the purpose of applying effects.
Elements of the Layers Dialog
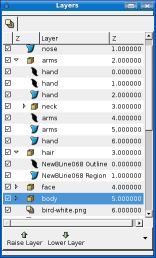
The Layers Dialog contains a detailed list of the {{l|Layer|Layers]] in your scene. Each row represents a layer, and the columns are:
- Show/Hide checkbox
- Turns the layer on or off in the composition. This parameter is not keyable.
- Z (This column will likely be renamed in subsequent releases)
- The icon representing the layer type. For {{l|Region Layer|Regions]], {{l|Outline Layer|Outlines]], and {{l|Gradient Layer Category|Gradients]], the icons will be those of the {{l|Bline Tool]], the {{l|Width Tool]], and the {{l|Gradient Tool]], respectively.
- Layer Name
- The name of the layer you're currently working on.
- Z (does not always appear)
- The second Z column indicates the Z position of the layer, which can also affect layer compositing.
Below the layer list, are buttons (and a drop down menu containing any buttons that don't fit on the palette) for the basic layer commands. These are the same commands found in the {{l|Layer Menu]] in the {{l|Canvas Menu Caret]][1], and in the context menu for the Layer Dialog.