Difference between revisions of "Keyframe"
(Initial release) |
m (→Adding, duplicating and removing keyframes: use template) |
||
| (129 intermediate revisions by 11 users not shown) | |||
| Line 1: | Line 1: | ||
| − | + | {{TOCright}} | |
| − | + | {{NewTerminology}} | |
| + | {{Category|Glossary}} | ||
== What is a keyframe? == | == What is a keyframe? == | ||
| + | A keyframe is a basically a "mark" in the timeline. This mark allows the user to make Synfig remember the state of the animation at that point (frame). It means that the keyframe is like a label that tell Synfig that this frame should be taken into account when creating waypoints. It also indicates that the marked frame is a special frame where the information of ''every parameter of every layer is stored in order to be reused later''. | ||
| − | + | Each keyframe is associated with a particular frame and a frame can only have one keyframe. | |
| + | == What does a keyframe looks like? == | ||
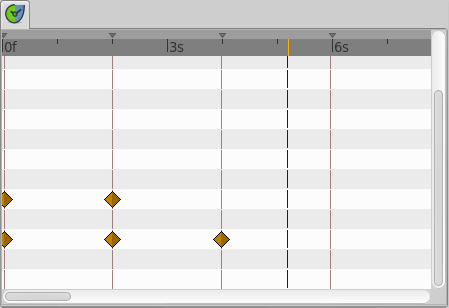
| + | A keyframe looks like a light brown vertical dashed line in the {{l|Timetrack Panel}} placed at the corresponding frame. You can distinguish it from the {{l|Time_Cursor}} by its color (the time cursor is blue). | ||
| − | + | [[File:KeyframesLook-TimeTrack 0.63.06.png|frame|none]] | |
| + | The symbols shown in the image are {{l|Waypoints|waypoints}}. | ||
| − | + | The keyframe representation in the {{l|Timebar}} change according their states : {{literal|Normal}}, {{literal|Selected}} or {{literal|Deactivated}} | |
| + | [[File:Keyframe State Representation.png|frame|none|Three keyframes with three different states : '''Normal''', '''Selected''' and '''Deactivated''']] | ||
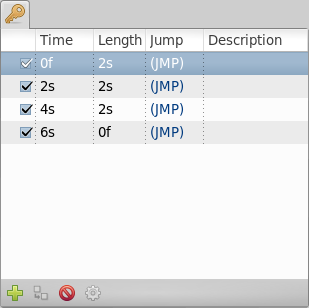
| − | + | Keyframes also appear as entries in a list in the {{l|Keyframes Panel}} | |
| + | [[File:KeyframesLook-KeyframePanel 0.63.06.png|frame|none]] | ||
| − | + | '''Documentation writers note:''' You can download the project to generate the screenshot : {{l|File:Keyframe-lookslike.sifz}} | |
== Keyframes and waypoints == | == Keyframes and waypoints == | ||
| − | A keyframe | + | A keyframe doesn't necessarily imply a waypoint, and a waypoint doesn't necessarily imply a keyframe. |
| − | A keyframe could live all the time without any waypoint but it stores the information of the values of the parameters on that specific frame. If there is a waypoint there then the waypoint information | + | A keyframe could live all the time without any waypoint but it stores the information of the values of the parameters on that specific frame. If there is a waypoint there then the waypoint information (only the parameter value) is stored too. If there is no waypoint in the keyframe then its "stored" value is the result of the surrounding waypoints, its parameter values and the interpolation values the waypoints have. This means that a keyframe remembers the values of the parameters at that frame but does not keep them static at that frame. To maintain a parameter's value static in a certain frame you must use a waypoint. |
| − | + | The creation of a waypoint can cause the creation of new waypoints on the neighboring keyframes depending on the current value of the {{l|Lock Keyframes}} state. So, maybe, the creation of a waypoint (modifying a parameter or pasting or moving a waypoint or even duplicating a keyframe) can lead to the creation of a waypoint in the keyframes that are immediately before and after the inserted waypoint's frame. The waypoints created in the neighboring keyframes are created according to the {{l|New Layer Defaults#Default Interpolation|default interpolation value}} in the {{l|Toolbox |toolbox window}}. | |
| − | + | See the {{l|#Examples|examples}} to understand how this works. | |
| − | + | == Adding, duplicating and removing keyframes == | |
| + | <!-- Use of Template:KeyframeAddRemoveDuplicate --> | ||
| + | {{KeyframeAddRemoveDuplicate}} | ||
| − | + | == Editing keyframes: time, length & description == | |
| − | + | You can see in the Keyframe list dialog that there are four headers and before that, an empty column. This empty column maintain checkboxs related to keyframe activation : enabled or disabled. | |
| − | + | ||
| − | + | ||
| − | + | ||
| − | + | [[File:KeyframesLook-KeyframePanel 0.63.06.png|frame|none]] | |
| − | + | * "Empty" [CheckBox] | |
| + | * Time | ||
| + | * Length | ||
| + | * Jump | ||
| + | * Description | ||
| − | == | + | === Activation === |
| + | By changing the state of the checkbox you can activate or disable the keyframe. A visual information about the keyframe state is displayed in the {{l|Timebar}}. | ||
| − | + | === Time === | |
| + | |||
| + | You can modify the time (frame) where the keyframe is placed just making a click in the corresponding {{Literal|Time}} cell. It will allow modify the time forward or backward the amount that you want. You can also manually place a keyframe at the desired time using the {{l|Timebar}}. | ||
| + | |||
| + | Modifying the Time of a keyframe has the following effects: | ||
| + | |||
| + | # The existing {{l|Waypoints}} in the keyframe will move to the new position. | ||
| + | # If any parameter have a a waypoint in the time line, then the moved keyframe will have a new waypoint set to {{l|New_Layer_Defaults#Default_Interpolation|default interpolation}} on those paramter(s). | ||
| + | # According to the default interpolation method and the {{l|Lock Keyframes}} status and to the parameters that have any waypoint in the time line, new waypoints will be created on the neighbouring keyframes of the destiny time (frame). The original neighbouring keyframes will be untouched if don't coincide with the destiny neighbouring keyframes. | ||
| + | # If a keyframe is displaced and doesn't "jump" over other existing keyframe then the waypoints that are surrounding the original position of the moved keyframe are compressed and / or expanded in the timeline depending on the displacement of the keyframe. See the examples. <cite> This is a recent discovered behaviour</cite> | ||
| + | |||
| + | You cannot set the time of other keyframe. If you try to set the time of a certain keyframe to be the same time of another existing keyframe then the program gives you this message: | ||
| + | |||
| + | keyframe_set: Cannot change keyframe time because another keyframe already exists | ||
| + | with that time. | ||
| + | |||
| + | See {{l|#Change Keyframe Time|the example}} to see how changing the time of a keyframe works. | ||
| + | |||
| + | === Length === | ||
| + | |||
| + | Length parameter sets the time the keyframe is exposed in the timeline until next keyframe. You can also manually change the length parameter using the {{l|Timebar}} and holding {{Shortcut|alt}} key on releasing the mouse button. | ||
| + | |||
| + | Changing the parameter shifts all following keyframes and {{l|Waypoints}} forward or backwards. | ||
| + | |||
| + | === Jump === | ||
| + | |||
| + | The Jump column is only a short cut to place the {{l|Time_Cursor}} at the keyframe where you make a click in the {{Literal|(JMP)}} label. | ||
| + | |||
| + | === Description === | ||
| + | |||
| + | This cell allow the user insert a short description of the meaning of the keyframe. Just make click on it and change the text. | ||
| + | |||
| + | == Editing Keyframe Properties == | ||
| + | [[File:KeyframeButton Properties 0.63.06.png|frame|none]] | ||
| + | |||
| + | Hitting the keyframe Properties button, the {{Literal|Keyframe Properties}} dialog will appear. This dialog allows change the interpolation method for all the waypoints on the keyframe at the same time. Even if, for a certain parameter, there is no waypoint on the keyframe but the parameter have other waypoints in the time line, then when you apply the {{Literal|Keyframe Properties}} you will add a waypoint at that keyframe were there aren't currently any waypoint. The added waypoints have the interpolation methods stated by the dialog. It means that the {{Literal|Keyframe Properties}} dialog will modify the interpolation methods for all the parameters that have any waypoint in the time line. | ||
| + | |||
| + | The dialog have the following parameters: | ||
| + | |||
| + | [[File:KeyframeDialog 0.63.06.png|frame|none]] | ||
| + | * In: Checking this value you can change the interpolation method of the left part of the waypoints of the current selected keyframe of all the layers of the canvas to the selected {{l|Waypoints#Interpolation|interpolation method}} in the drop down menu. | ||
| + | * Out: Same but for the right part of the waypoint. | ||
| + | * Tension: See {{l|TCB}} | ||
| + | * Bias: See {{l|TCB}} | ||
| + | * Continuity: See {{l|TCB}} | ||
| + | * Temporal Tension: See {{l|TCB}} | ||
| + | |||
| + | You can check only one of both {{Literal|In}} or {{Literal|Out}} check boxes to only affect the change to the left or right part of the waypoints. The non checked part would not be modified. Same comment applies for the Manual interpolation method parameters ({{Literal|Tension}}, {{Literal|Bias}}, {{Literal|Continuity}} and {{Literal|Temporal Tension}}) | ||
| + | |||
| + | [[File:KeyframeDialog2 0.63.06.png|frame|none]] | ||
| + | |||
| + | This dialog would not affect what's the interpolation method for a new waypoint created by the user, automatically created by the {{l|Keyframe#Duplicate_a_keyframe|keyframe duplication}} or by the {{l|Lock_Keyframes|lock keyframe}} state. The interpolation methods for new waypoints created in those cases will be both the same ({{Literal|In}} and {{Literal|Out}} or Left and Right) and depend only on the {{l|New_Layer_Defaults#Default_Interpolation|Default interpolation}} method of the {{l|:Category:Toolbox|Toolbox}} window. | ||
| + | |||
| + | See the {{l|#Examples|examples}} to understand better how it works. | ||
| + | |||
| + | == Edit a keyframe from the timebar == | ||
| + | <!-- Use of Template:KeyframesInTheTimebar --> | ||
| + | {{KeyframesInTheTimebar}} | ||
| + | |||
| + | ==Examples == | ||
| + | |||
| + | === Duplicate a keyframe with no waypoint on it === | ||
| + | For example, imagine that you have following set of keyframes and waypoints and the corresponding parameter of the radius of a circle: | ||
| + | {| | ||
| + | {| border = "1" | ||
| + | |+ Before duplicate keyframe at 2s to 6s | ||
| + | !Frame!!Keyframe!!Waypoint!!Radius!!Interpolation | ||
| + | |- | ||
| + | |0s||yes||yes||20.0||TCB Smooth | ||
| + | |- | ||
| + | |2s||yes||no||25.0||n/a | ||
| + | |- | ||
| + | |4s||yes||no||30.0||n/a | ||
| + | |- | ||
| + | |8s||no||yes||40.0||TCB Smooth | ||
| + | |} | ||
| + | |||
| + | |||
| + | [[File:Keyframe-GraphBeforeDuplicate 0.63.06.png|frame|none]] | ||
| + | |||
| + | notice that although the interpolation between 0s and 8s is TCB Smooth the real result | ||
| + | is linear due that they are the only two waypoints of the animation for that parameter. | ||
| + | |||
| + | If you select the keyframe at 2s, place the time cursor at 6s (where there isn't a keyframe), set the {{l|New Layer Defaults#Default interpolation | default interpolation}} to {{l|TCB|TCB Smooth}}, and have the {{l|Lock Keyframes | lock keyframe status}} to {{Literal|All keyframes locked}} and press the {{Literal|Duplicate keyframe}} button, then the result is the following: | ||
| + | |||
| + | {| border = "1" | ||
| + | |+ After duplicate keyframe at 2s to 6s | ||
| + | !Frame!!Keyframe!!Waypoint!!Radius!!Interpolation | ||
| + | |- | ||
| + | |0s||yes||yes||20.0||TCB Smooth | ||
| + | |- | ||
| + | |2s||yes||no||25,78125||n/a | ||
| + | |- | ||
| + | |4s||yes||yes||30.0||TCB Smooth | ||
| + | |- | ||
| + | |6s||yes||yes||25.0||TCB Smooth | ||
| + | |- | ||
| + | |8s||no||yes||40.0||TCB Smooth | ||
| + | |} | ||
| + | |||
| + | |||
| + | [[File:Keyframe-GraphAfterDuplicate 0.63.06.png|frame|none]] | ||
| + | |||
| + | You can see that: | ||
| + | # At 0s none has changed. Not affected by the insertion of the keyframe. It is two keyframes away from 6s and also have a waypoint. | ||
| + | # At 2s there was a keyframe and stills there. But previous to the creation of the keyframe at 6s the current interpolated value of the {{Literal|radius}} was 25.0. After the creation of the keyframe at 6s the radius is the result of the interpolation between 0s and 4s frames waypoints with its radius values and its interpolation methods. That is 25.78125. This keyframe is more than one keyframe away from the new 6s keyframe so no waypoint is created. | ||
| + | #At 4s there was a keyframe and still being there. But in this case the 4s keyframe is a neighbor of the new 6s keyframe. As well as the lock keyframe state was set to {{Literal|All keyframes locked}} then the keyframe at 4s has been locked adding a waypoint on it. The radius value hasn't changed (still being 30.0) because it was locked adding a waypoint with its current value). The Interpolation mode of the waypoint was set to {{Literal|TCB Smooth}} as stated by its default value. | ||
| + | # At 6s there is a new keyframe with a new waypoint with the old value of the interpolated value of the keyframe at 2s. That is a {{Literal|radius}} of 25.0. | ||
| + | #At 8s nothing has changed. There wasn't any keyframe and there was a waypoint so nothing is expected to change. | ||
| + | |||
| + | Return to the previous state before you duplicate the keyframe with the {{l|History Panel}}, and imagine now that you do the same operations but you choose the default interpolation set to {{l|Constant}}. Then the result is the following: | ||
| + | |||
| + | {| border = "1" | ||
| + | |+ After duplicate keyframe at 2s to 6s (constant interpolation) | ||
| + | !Frame!!Keyframe!!Waypoint!!Radius!!Interpolation | ||
| + | |- | ||
| + | |0s||yes||yes||20.0||TCB Smooth | ||
| + | |- | ||
| + | |2s||yes||no||20.0||n/a | ||
| + | |- | ||
| + | |4s||yes||yes||30.0||Constant | ||
| + | |- | ||
| + | |6s||yes||yes||25.0||TCB Smooth | ||
| + | |- | ||
| + | |8s||no||yes||40.0||TCB Smooth | ||
| + | |} | ||
| + | |||
| + | |||
| + | [[File:Keyframe-GraphAfterDuplicateConstant 0.63.06.png|frame|none]] | ||
| + | |||
| + | |||
| + | Now you can see that the keyframe at 2s doesn't hold the value of the parameter by itself. It only remember the value if a waypoint is created on it, by the result of the insertion of a neighbour waypoint, or if a keyframe is duplicated and the lock keyframe status affects that keyframe. In this example the value at 2s has changed drastically due to the different interpolation method for the created waypoint on 4s. If in this situation you duplicate again the keyframe at 2s to other frame (ej. 10s) then it would copy a keyframe with a waypoint on it with a radius's value of 20.0, what is the current value of the parameter in that keyframe before duplicate it. | ||
| + | |||
| + | '''Documentation writers note:''' You can download the project to generate the screenshot : {{l|File:Keyframe-example1.sifz}} | ||
| + | |||
| + | === Editing Keyframe Properties === | ||
| + | |||
| + | Consider this situation for a certain layer: | ||
| + | |||
| + | [[File:KeyframeProperties-BeforeChange 0.63.06.png|frame|none]] | ||
| + | |||
| + | In the sample the animation duration is 10 seconds so the image shows all the existing waypoints and keyframes. The time cursor isn't over any keyframe. | ||
| + | |||
| + | Now consider that you have the following default values: | ||
| + | |||
| + | * {{l|New Layer Defaults#Default Interpolation|Default Interpolation}} method set to {{Literal|Ease in/out}} | ||
| + | * {{l|Lock Keyframes| Lock Keyframes}} status set to {{Literal|All Keyframes Locked}} | ||
| + | |||
| + | Now select the keyframe at frame 4s in the keyframe list. Press the {{Literal|Keyframe Properties}} button and set the following interpolation method: | ||
| + | |||
| + | [[File:KeyframeDialog3 0.63.06.png|frame|none]] | ||
| + | |||
| + | and press {{Literal|Apply}} button. The result will be this: | ||
| + | |||
| + | [[File:KeyframeProperties-After 0.63.06.png|frame|none]] | ||
| + | |||
| + | You can see the following effects: | ||
| + | |||
| + | # The existing waypoints at 4s keyframe have changed its interpolation methods according to the {{Literal|Keyframe Properties}} dialog. | ||
| + | # There are new added waypoints at 4s keyframe. The waypoints are added to the paramters that have almost one waypoint in the time line (for example the one that have only a waypoint at 9s). The added waypoints at 4s keyframe have the interpolation settings that was stated by the {{Literal|Keyframe Properties}} dialog. | ||
| + | # New waypoints have been created for the neighbouring keyframes to 4s (2s and 6s) for all the parameters that have any waypoint in the time line. The waypoints are created in the neighbouring keyframes according to the {{l|Lock Keyframes |Lock Keyframes}} status. Also the created waypoints interpolation method responds to the {{l|New Layer Defaults#Default Interpolation|default interpolation}} method you have set. | ||
| + | |||
| + | If in the {{Literal|Keyframe Properties}} dialog you were checked off the {{Literal|Out}} or the {{Literal|In}} check boxes then it would have happened two things: | ||
| + | |||
| + | # The existing waypoints at 4s would only change its interpolation method on the side the check box was checked on. The other side will be untouched. | ||
| + | # The new added waypoints will have the interpolation method set to {{Literal|TCB Smooth}} method where the check box is off and the interpolation method set by the {{Literal|keyframe properties}} dialog where the check box is on. | ||
| + | |||
| + | [[File:KeyframeProperties-After2 0.63.06.png|frame|none]] | ||
| + | |||
| + | In this sample it was only checked on the {{Literal|In}} check box. | ||
| + | |||
| + | '''Documentation writers note:''' You can download the project to generate the screenshot : {{l|File:Keyframe-example2.sifz}} | ||
| + | |||
| + | === Change Keyframe Time === | ||
| + | |||
| + | ==== Without waypoints between keyframes ==== | ||
| + | |||
| + | Consider again this situation for a certain layer: | ||
| + | |||
| + | [[File:KeyframeProperties-BeforeChange 0.63.06.png|frame|none]] | ||
| + | |||
| + | Now consider that you have the following default values: | ||
| + | |||
| + | * {{l|New Layer Defaults#Default Interpolation|Default Interpolation}} method set to {{Literal|Ease in/out}} | ||
| + | * {{l|Lock Keyframes| Lock Keyframes}} status set to {{Literal|All Keyframes Locked}} | ||
| + | |||
| + | Now select the keyframe at frame 4s in the keyframe list. Make a click in the {{Literal|Time}} cell and modify the time to be 3s. The result will be this: | ||
| + | |||
| + | [[File:KeyframeTime-After 0.63.06.png|frame|none]] | ||
| + | |||
| + | ==== With waypoints between keyframes ==== | ||
| + | |||
| + | Consider now this situation for a certain layer: | ||
| + | |||
| + | [[File:KeyframeWaypointTime-BeforeChange 0.63.06.png|frame|none]] | ||
| + | |||
| + | Now consider that you have the following default values: | ||
| + | |||
| + | |||
| + | * {{l|New Layer Defaults#Default Interpolation|Default Interpolation}} method set to {{Literal|Ease in/out}} | ||
| + | * {{l|Lock Keyframes| Lock Keyframes}} status set to {{Literal|All Keyframes Locked}} | ||
| + | |||
| + | Now select the keyframe at 4s in the keyframe list. Make a click in the {{Literal|Time}} cell and modify the time to be 2s. The result is this: | ||
| + | |||
| + | [[File:KeyframeWaypointTime-After 0.63.06.png|frame|none]] | ||
| + | |||
| + | You can see how the waypoints at right and left of the moved keyframe have been compressed and expanded in the time line. Also notice that any waypoint has been formed in the moved keyframe at the paramter at the bottom of the list but yes in the static keyframes. | ||
| + | |||
| + | It seems to be a bug (?) - to be verified. | ||
| + | |||
| + | Trying to understand this behaviour I see that also the keyframes keep the waypoints between two adjacent keyframes although you move them, keeping the distribution of the waypoints in the portion of time line between keyframes. This behaviour doesn't happen if the moved keyframe "jumps" over other keyframe when moved. <cite> Please add here as much information you can discover about keyframes behaviour. It seems that there are some bugs and any information is welcome</cite> | ||
| + | |||
| + | '''Documentation writers note:''' You can download the project to generate the screenshot : {{l|File:Keyframe-example3.sifz}} | ||
== Advanced uses of keyframes == | == Advanced uses of keyframes == | ||
| − | + | ===Reusing keyframes=== | |
| + | If you want to learn more about advanced uses of keyframes see this tutorial about reusing animations. Keyframes can be like stored "poses" that can be reused several time in the animation. Very useful for lip sync. | ||
| + | |||
| + | {{l|Reuse Animations}} | ||
| + | |||
| + | ===Usage of Onionskin=== | ||
| + | |||
| + | To properly use the onion skin feature ({{Shortcut|alt|O}} or {{c|<Menu Caret>|<View>|Toggle Onion Skin|}}) you should consider the frame where the keyframes are set. Onion skin will show you the before and after keyframes images with a 50% opaque copy of the current view. Also the current view is 50% opaque. | ||
| + | |||
| + | See {{l|Onion Skin|Onion Skin}} for more detail. | ||
| + | |||
| + | ===Quickly creating/importing Keyframes=== | ||
| + | Using a [https://github.com/berteh/import-audacity-labels-keyframes Synfig plug-in] it is possible to quickly import keyframes from a list of timings, as explained in the [[Doc:Audio Synchronisation|Audio Synchronisation]] tutorial. | ||
Latest revision as of 16:59, 4 October 2015
What is a keyframe?
A keyframe is a basically a "mark" in the timeline. This mark allows the user to make Synfig remember the state of the animation at that point (frame). It means that the keyframe is like a label that tell Synfig that this frame should be taken into account when creating waypoints. It also indicates that the marked frame is a special frame where the information of every parameter of every layer is stored in order to be reused later.
Each keyframe is associated with a particular frame and a frame can only have one keyframe.
What does a keyframe looks like?
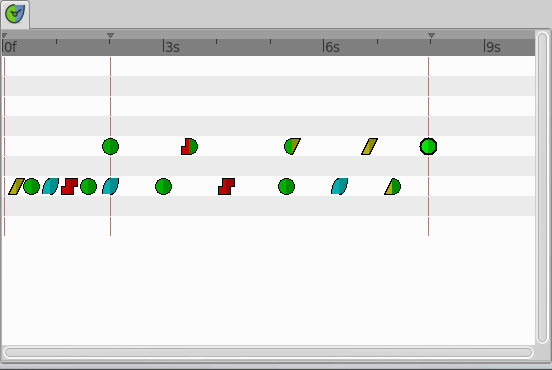
A keyframe looks like a light brown vertical dashed line in the Time Track Panel placed at the corresponding frame. You can distinguish it from the Time Cursor by its color (the time cursor is blue).
The symbols shown in the image are waypoints.
The keyframe representation in the Timebar change according their states : "Normal", "Selected" or "Deactivated"
Keyframes also appear as entries in a list in the Keyframes Panel
Documentation writers note: You can download the project to generate the screenshot : File:Keyframe-lookslike.sifz
Keyframes and waypoints
A keyframe doesn't necessarily imply a waypoint, and a waypoint doesn't necessarily imply a keyframe.
A keyframe could live all the time without any waypoint but it stores the information of the values of the parameters on that specific frame. If there is a waypoint there then the waypoint information (only the parameter value) is stored too. If there is no waypoint in the keyframe then its "stored" value is the result of the surrounding waypoints, its parameter values and the interpolation values the waypoints have. This means that a keyframe remembers the values of the parameters at that frame but does not keep them static at that frame. To maintain a parameter's value static in a certain frame you must use a waypoint.
The creation of a waypoint can cause the creation of new waypoints on the neighboring keyframes depending on the current value of the Editing Lock Keyframes state. So, maybe, the creation of a waypoint (modifying a parameter or pasting or moving a waypoint or even duplicating a keyframe) can lead to the creation of a waypoint in the keyframes that are immediately before and after the inserted waypoint's frame. The waypoints created in the neighboring keyframes are created according to the default interpolation value in the toolbox window.
See the examples to understand how this works.
Adding, duplicating and removing keyframes
Add a keyframe
Place the time cursor at a frame where there isn't currently any keyframe. Then press the "Add new Keyframe" button. If you place the time cursor at a frame where there is currently an existing keyframe or if animation Start Time egals animation End Time (animation Duration is 0m 0s 1f) then the "Add new Keyframe" button is disabled. Once you press the button then a new entry is added to the list of keyframes and a vertical dashed line is added in the time line. No waypoint is created.
Duplicate a keyframe
Select a keyframe in the keyframe list of the Keyframes Panel and place the cursor at a frame where there isn't currently any keyframe. Then press the "Duplicate Keyframe" button. This would have two separated effects:
- If there is a waypoint at the original keyframe then the waypoint is duplicated. Its duplication includes the parameter value and its interpolation types.
- If there is no waypoint in the original keyframe for any particular parameter then two things could happen:
- There is no waypoint for that parameter at ANY frame in the time line: Then NO waypoint is created.
- If there is a waypoint in the time line for that parameter, but not in the keyframe that is going to be duplicated, then in the duplicated keyframe is created a new waypoint with a value for the parameter of the result of the current value at the original keyframe and a "TCB Smooth" interpolation type for both "In" and "Out".
Of course, duplicate a keyframe will produce a new keyframe at the place pointed by the time cursor and will add a new one to the keyframe list in the proper place. In the keyframe list, the new added keyframe have the same description than the original, plus a "(Duplicate)" at the end.
Remove a keyframe
Just select a keyframe from the keyframe list and press the Remove keyframe button. It will remove the keyframe and all the waypoints for all parameters for all layers that are currently there.
NOTE: If you move a keyframe by modifying its time in the keyframe list dialog and immediately press the Remove Keyframe button then the waypoints are not deleted. It seems to be a bug but also can be considered a feature if you really want to keep the waypoints and not the keyframe.
Editing keyframes: time, length & description
You can see in the Keyframe list dialog that there are four headers and before that, an empty column. This empty column maintain checkboxs related to keyframe activation : enabled or disabled.
- "Empty" [CheckBox]
- Time
- Length
- Jump
- Description
Activation
By changing the state of the checkbox you can activate or disable the keyframe. A visual information about the keyframe state is displayed in the Timebar.
Time
You can modify the time (frame) where the keyframe is placed just making a click in the corresponding "Time" cell. It will allow modify the time forward or backward the amount that you want. You can also manually place a keyframe at the desired time using the Timebar.
Modifying the Time of a keyframe has the following effects:
- The existing Waypoints in the keyframe will move to the new position.
- If any parameter have a a waypoint in the time line, then the moved keyframe will have a new waypoint set to default interpolation on those paramter(s).
- According to the default interpolation method and the Editing Lock Keyframes status and to the parameters that have any waypoint in the time line, new waypoints will be created on the neighbouring keyframes of the destiny time (frame). The original neighbouring keyframes will be untouched if don't coincide with the destiny neighbouring keyframes.
- If a keyframe is displaced and doesn't "jump" over other existing keyframe then the waypoints that are surrounding the original position of the moved keyframe are compressed and / or expanded in the timeline depending on the displacement of the keyframe. See the examples. This is a recent discovered behaviour
You cannot set the time of other keyframe. If you try to set the time of a certain keyframe to be the same time of another existing keyframe then the program gives you this message:
keyframe_set: Cannot change keyframe time because another keyframe already exists
with that time.
See the example to see how changing the time of a keyframe works.
Length
Length parameter sets the time the keyframe is exposed in the timeline until next keyframe. You can also manually change the length parameter using the Timebar and holding Alt key on releasing the mouse button.
Changing the parameter shifts all following keyframes and Waypoints forward or backwards.
Jump
The Jump column is only a short cut to place the Time Cursor at the keyframe where you make a click in the "(JMP)" label.
Description
This cell allow the user insert a short description of the meaning of the keyframe. Just make click on it and change the text.
Editing Keyframe Properties
Hitting the keyframe Properties button, the "Keyframe Properties" dialog will appear. This dialog allows change the interpolation method for all the waypoints on the keyframe at the same time. Even if, for a certain parameter, there is no waypoint on the keyframe but the parameter have other waypoints in the time line, then when you apply the "Keyframe Properties" you will add a waypoint at that keyframe were there aren't currently any waypoint. The added waypoints have the interpolation methods stated by the dialog. It means that the "Keyframe Properties" dialog will modify the interpolation methods for all the parameters that have any waypoint in the time line.
The dialog have the following parameters:
- In: Checking this value you can change the interpolation method of the left part of the waypoints of the current selected keyframe of all the layers of the canvas to the selected interpolation method in the drop down menu.
- Out: Same but for the right part of the waypoint.
- Tension: See TCB
- Bias: See TCB
- Continuity: See TCB
- Temporal Tension: See TCB
You can check only one of both "In" or "Out" check boxes to only affect the change to the left or right part of the waypoints. The non checked part would not be modified. Same comment applies for the Manual interpolation method parameters ("Tension", "Bias", "Continuity" and "Temporal Tension")
This dialog would not affect what's the interpolation method for a new waypoint created by the user, automatically created by the keyframe duplication or by the lock keyframe state. The interpolation methods for new waypoints created in those cases will be both the same ("In" and "Out" or Left and Right) and depend only on the Default interpolation method of the Toolbox window.
See the examples to understand better how it works.
Edit a keyframe from the timebar
You can adjust the Time of a keyframe by a normal drag and drop. To adjust it's Length, hold Alt key when releasing the mouse button.
During a keyframe drag and drop operation a tooltip indicator will be displayed with some time informations.
Right click over a keyframe or in upper part of the "Timebar" open the keyframe contextual menu giving access to the keyframes actions.
Examples
Duplicate a keyframe with no waypoint on it
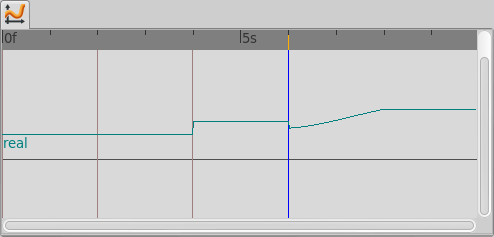
For example, imagine that you have following set of keyframes and waypoints and the corresponding parameter of the radius of a circle:
| Frame | Keyframe | Waypoint | Radius | Interpolation |
|---|---|---|---|---|
| 0s | yes | yes | 20.0 | TCB Smooth |
| 2s | yes | no | 25.0 | n/a |
| 4s | yes | no | 30.0 | n/a |
| 8s | no | yes | 40.0 | TCB Smooth |
notice that although the interpolation between 0s and 8s is TCB Smooth the real result
is linear due that they are the only two waypoints of the animation for that parameter.
If you select the keyframe at 2s, place the time cursor at 6s (where there isn't a keyframe), set the default interpolation to TCB Smooth, and have the lock keyframe status to "All keyframes locked" and press the "Duplicate keyframe" button, then the result is the following:
| Frame | Keyframe | Waypoint | Radius | Interpolation |
|---|---|---|---|---|
| 0s | yes | yes | 20.0 | TCB Smooth |
| 2s | yes | no | 25,78125 | n/a |
| 4s | yes | yes | 30.0 | TCB Smooth |
| 6s | yes | yes | 25.0 | TCB Smooth |
| 8s | no | yes | 40.0 | TCB Smooth |
You can see that:
- At 0s none has changed. Not affected by the insertion of the keyframe. It is two keyframes away from 6s and also have a waypoint.
- At 2s there was a keyframe and stills there. But previous to the creation of the keyframe at 6s the current interpolated value of the "radius" was 25.0. After the creation of the keyframe at 6s the radius is the result of the interpolation between 0s and 4s frames waypoints with its radius values and its interpolation methods. That is 25.78125. This keyframe is more than one keyframe away from the new 6s keyframe so no waypoint is created.
- At 4s there was a keyframe and still being there. But in this case the 4s keyframe is a neighbor of the new 6s keyframe. As well as the lock keyframe state was set to "All keyframes locked" then the keyframe at 4s has been locked adding a waypoint on it. The radius value hasn't changed (still being 30.0) because it was locked adding a waypoint with its current value). The Interpolation mode of the waypoint was set to "TCB Smooth" as stated by its default value.
- At 6s there is a new keyframe with a new waypoint with the old value of the interpolated value of the keyframe at 2s. That is a "radius" of 25.0.
- At 8s nothing has changed. There wasn't any keyframe and there was a waypoint so nothing is expected to change.
Return to the previous state before you duplicate the keyframe with the History Panel, and imagine now that you do the same operations but you choose the default interpolation set to Constant. Then the result is the following:
| Frame | Keyframe | Waypoint | Radius | Interpolation |
|---|---|---|---|---|
| 0s | yes | yes | 20.0 | TCB Smooth |
| 2s | yes | no | 20.0 | n/a |
| 4s | yes | yes | 30.0 | Constant |
| 6s | yes | yes | 25.0 | TCB Smooth |
| 8s | no | yes | 40.0 | TCB Smooth |
Now you can see that the keyframe at 2s doesn't hold the value of the parameter by itself. It only remember the value if a waypoint is created on it, by the result of the insertion of a neighbour waypoint, or if a keyframe is duplicated and the lock keyframe status affects that keyframe. In this example the value at 2s has changed drastically due to the different interpolation method for the created waypoint on 4s. If in this situation you duplicate again the keyframe at 2s to other frame (ej. 10s) then it would copy a keyframe with a waypoint on it with a radius's value of 20.0, what is the current value of the parameter in that keyframe before duplicate it.
Documentation writers note: You can download the project to generate the screenshot : File:Keyframe-example1.sifz
Editing Keyframe Properties
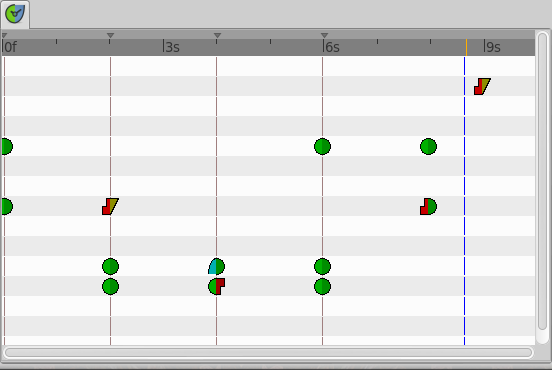
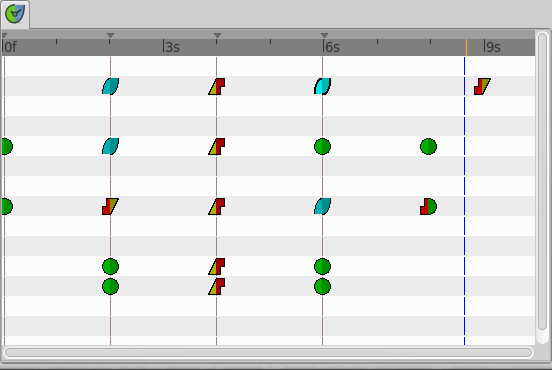
Consider this situation for a certain layer:
In the sample the animation duration is 10 seconds so the image shows all the existing waypoints and keyframes. The time cursor isn't over any keyframe.
Now consider that you have the following default values:
- Default Interpolation method set to "Ease in/out"
- Lock Keyframes status set to "All Keyframes Locked"
Now select the keyframe at frame 4s in the keyframe list. Press the "Keyframe Properties" button and set the following interpolation method:
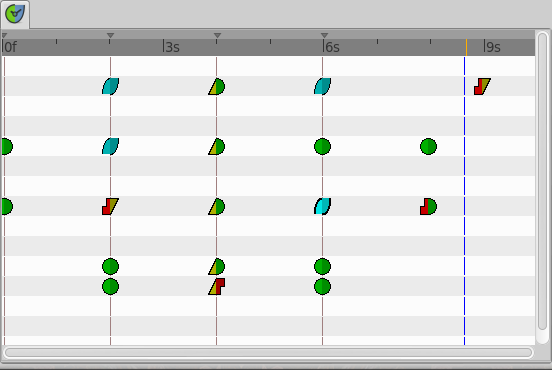
and press "Apply" button. The result will be this:
You can see the following effects:
- The existing waypoints at 4s keyframe have changed its interpolation methods according to the "Keyframe Properties" dialog.
- There are new added waypoints at 4s keyframe. The waypoints are added to the paramters that have almost one waypoint in the time line (for example the one that have only a waypoint at 9s). The added waypoints at 4s keyframe have the interpolation settings that was stated by the "Keyframe Properties" dialog.
- New waypoints have been created for the neighbouring keyframes to 4s (2s and 6s) for all the parameters that have any waypoint in the time line. The waypoints are created in the neighbouring keyframes according to the Lock Keyframes status. Also the created waypoints interpolation method responds to the default interpolation method you have set.
If in the "Keyframe Properties" dialog you were checked off the "Out" or the "In" check boxes then it would have happened two things:
- The existing waypoints at 4s would only change its interpolation method on the side the check box was checked on. The other side will be untouched.
- The new added waypoints will have the interpolation method set to "TCB Smooth" method where the check box is off and the interpolation method set by the "keyframe properties" dialog where the check box is on.
In this sample it was only checked on the "In" check box.
Documentation writers note: You can download the project to generate the screenshot : File:Keyframe-example2.sifz
Change Keyframe Time
Without waypoints between keyframes
Consider again this situation for a certain layer:
Now consider that you have the following default values:
- Default Interpolation method set to "Ease in/out"
- Lock Keyframes status set to "All Keyframes Locked"
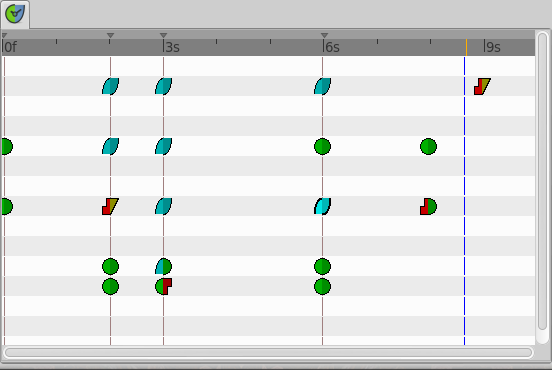
Now select the keyframe at frame 4s in the keyframe list. Make a click in the "Time" cell and modify the time to be 3s. The result will be this:
With waypoints between keyframes
Consider now this situation for a certain layer:
Now consider that you have the following default values:
- Default Interpolation method set to "Ease in/out"
- Lock Keyframes status set to "All Keyframes Locked"
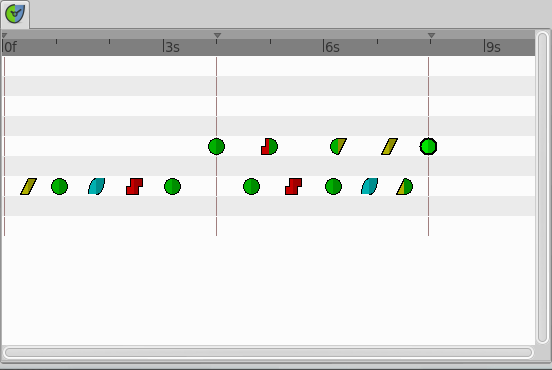
Now select the keyframe at 4s in the keyframe list. Make a click in the "Time" cell and modify the time to be 2s. The result is this:
You can see how the waypoints at right and left of the moved keyframe have been compressed and expanded in the time line. Also notice that any waypoint has been formed in the moved keyframe at the paramter at the bottom of the list but yes in the static keyframes.
It seems to be a bug (?) - to be verified.
Trying to understand this behaviour I see that also the keyframes keep the waypoints between two adjacent keyframes although you move them, keeping the distribution of the waypoints in the portion of time line between keyframes. This behaviour doesn't happen if the moved keyframe "jumps" over other keyframe when moved. Please add here as much information you can discover about keyframes behaviour. It seems that there are some bugs and any information is welcome
Documentation writers note: You can download the project to generate the screenshot : File:Keyframe-example3.sifz
Advanced uses of keyframes
Reusing keyframes
If you want to learn more about advanced uses of keyframes see this tutorial about reusing animations. Keyframes can be like stored "poses" that can be reused several time in the animation. Very useful for lip sync.
Usage of Onionskin
To properly use the onion skin feature (AltO or "<Menu Caret> → <View> → Toggle Onion Skin") you should consider the frame where the keyframes are set. Onion skin will show you the before and after keyframes images with a 50% opaque copy of the current view. Also the current view is 50% opaque.
See Onion Skin for more detail.
Quickly creating/importing Keyframes
Using a Synfig plug-in it is possible to quickly import keyframes from a list of timings, as explained in the Audio Synchronisation tutorial.
